How to upload a Sampler Pack
creating & uploading sample packs
VirtualDJ offers users the ability to download audio and video Sample Packs for use in the software's Sampler. Additionally, users can create and upload their own Sample Packs to share with the VirtualDJ Community.
If you wish to upload your own creations, you will need to follow the steps in this guide. Sample Packs that do not follow this process will not be accepted.
creating sample packs
1. Go to Settings Options and set SamplerDontSaveSource to Yes. This is will hide your computer's folder paths and simplify the process for uploading later.


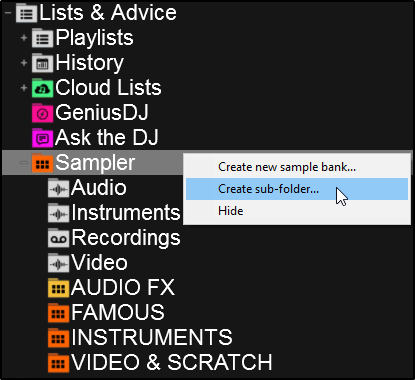
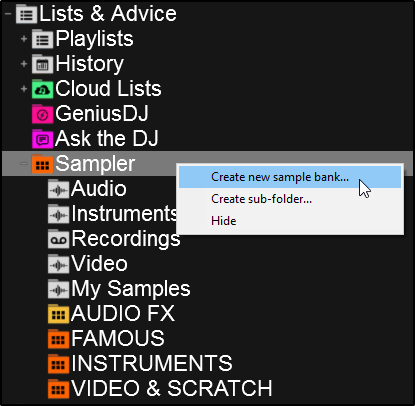
4. Locate the samples you wish to use for your Sample Pack in VirtualDJ's browser and drag them to the Sample folder that you are going to use. Hold the CTRL key to copy them to the folder when dropping them in. This will create a physical copy of the file without having to alter it's original location. You can drag multiple files to the folder at the same time by using OS keyboard shortcuts (ctrl+A to select all).

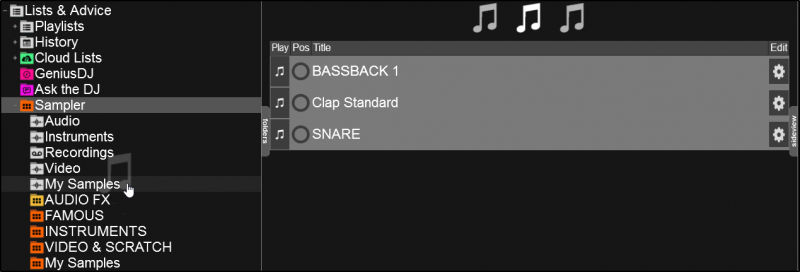
5. Open the Sampler in the Sideview and locate your newly created bank. From the new Sample folder you just added your samples to, drag and drop your samples to the new bank, arrange, edit, etc. until you are satisfied with the results. For more information on adding and editing samples please see the Sampler and Sampler Editor sections of the User Manual.

6. Once you are satisfied with your Sample Bank you can close VirtualDJ. Your folder and bank will be saved automatically.
7. Now go to your computer's OS and find Documents/VirtualDJ/Sampler. Inside this folder you will find the folder and bank (XML) you created in the software. Select both by clicking on the folder and then using CTRL + left-click to select the XML (this will highlight both files).

8. You can now Zip the 2 files together by right clicking and selecting the option depending on your operating system:
For Windows: Right-click > Send To > Compressed (Zipped) folder
For Mac: Right-click (2 finger click on trackpads) and select Compress "Sample Pack" (name of Sample Pack)
9. Your zipped file will be saved in the VirtualDJ/Sampler folder and is now ready to upload.
uploading sample packs
After you have created Audio or Video Samples for VirtualDJ 8 that you wish to share with the VirtualDJ Community, please upload it to the Add-ons page by following the next steps:
- Visit the Upload Add-ons page (you need to be logged in)
- Select Samples Pack as the type of Add-on and choose one of the available categories.(required)

- Type a name for your Samples Pack (required). Use a simple, short and unique name. Avoid reserved words such as Default and VirtualDJ. If the name is already available, you will be notified on submission so that you can change it to a new one.

- Description, Image and Hashtags
- Provide some short text (optional) that best describes your Sample Pack (no more than a couple of short lines - you will be able to provide further details and instructions after approval in the Comments topic)
- Provide an image for your Sample Pack that will be visible in the Add-ons listing (required). Can be a very simple image with just text on it. Prefer an image of 16:9 aspect ratio (it will be resized to a 16:9 if a different one is provided).
- Optionally, provide any Hashtags (Search Key words) separated by comma. e.g. Drums, Kicks in case your Samples Pack contain these kind of Instruments


Tip : Set the option SamplerDontSaveSource (in Advanced Options of VirtualDJ Settings) to Yes, if you don't want your recorded samples to include the path of your computer into their names.


Rules to follow :
- Only submit once. if you submit the Add-on more than one time then all version will be removed and not considered. And then you can re-submit.
- It is your responsibility to review the status of your submissions. There are notes that may be left in the description that need attention on your Add-on. Do not expect a comment to be placed in a forum thread. Once you have made the corrections, then simply remove the comment made in the Description field when you update your submission. If no corrections are made in a reasonable amount of time - the submission will be removed.
- Submit only original creations and not Samples found over the Internet not created by you.
Notes:
- Do not share your creations by providing 3rd party sources (such as Dropbox and other Sharing media) in the VirtualDJ forums. If you wish to receive any feedback from users, please upload your creation to the Add-ons page by marking it as "Beta", or use personal messages with Licensed users.
- Open a topic in the Plugins Forum if you wish to get feedback, provide information or ask any questions about your Add-on.
- Once your Sample Pack is uploaded, the VirtualDJ Team will test and approve within a reasonable time (depending on the amount of submitted Addons) and will make the Sample Pack available in our Add-ons page.
- The VirtualDJ Team holds the right to reject your submission without notice, in case the submitted Add-on is not filling the requirements mentioned in each of the categories. In case you wish to ask any question regarding a rejected Add-on, please contact Support
- Updates go through the same approval process as if you had the Add-on submitted for the first time. So if you update your Add-on, keep in mind that there may be a delay for them to be available.
Related Topics:
FAQ How do I download and install new skins, effects, samples, etc. from your website ?
FAQ Can I share or sell the plugins available on the website ?
FAQ I have created a VirtualDJ Add-on. How can I upload and share it?
Navigation


